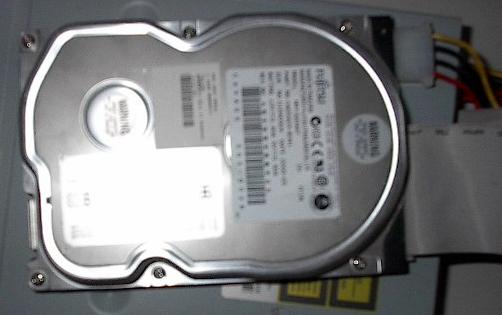
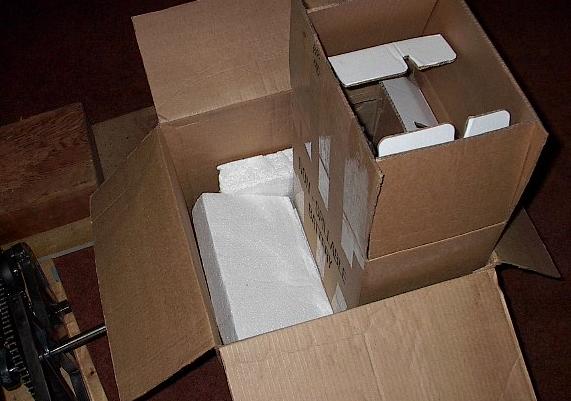
| In the beginning, before shipments begin, we do have a few little goodies to throw at our robot. The first of which is this cute little hard drive. This was in one of Christina's old boxen, and needed home. I was more than happy to oblige; a free goodie is a free goodie. Better yet, this is a low-RPM drive, which should save on power consumption and heat generation. What luck. Also donated to the cause was a stick of RAM (not pictured). |
 |
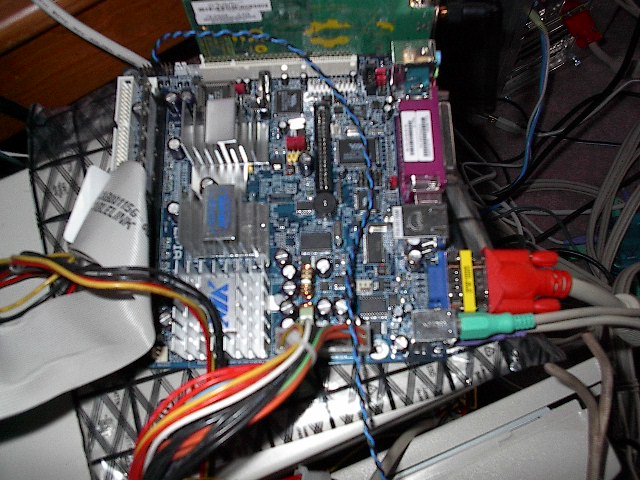
| 9.2.2004: The highest priority risk in our risk mitigation document was "Circuitry too fragile for regular use," for which we proposed buying it early and testing. Well, to that end, we wasted no time buying these little goodies. You're looking at it all wired up, with IDE cables and ram and a wireless card and everything. Isn't it cute? At the time this picture was taken it was up and running with Fedora Core 2, and it already had some nice UI stuff working, thanks to the efforts of our resident Christina. |
 |
| 10.6.2004: The procurement of these wireless cards went inconceivably well, and they are a large part of why we are currently under budget. You see, it is surprisingly difficult to find PCI wireless cards supported in Linux, and we just don't need the headache of writing our own drivers for this. Well, Christina finds someone on eBay selling a box full of the things at a great deal. I shell out the cash, she buys them, and then turns around and sells all of them but the three pictured here. Long story short, I gave her $425 and one month later she gives me three wireless cards and a check for $758. Yeah. That's right, carry the one, and that is -$111 for EACH of the three cards. I dare you to beat that price. |
 |
| 12.16.2004: I was planning on shelling out about $100 for some 1/4 inch lexan plating for various parts of the robot, including a big sheet to cover the whole top. Then, all of a sudden, one of my classmates comes up to me and asks if I want any polycarb for mechanical engineering lab experiments. Turns out, he works at an auto-glass place, and they have big stacks of cutoffs that they just give away for free. Well, he hooked me up and how! This is just some of the lexan he gave me, and should be more than enough for this project. Thanks Tyler! |
 |
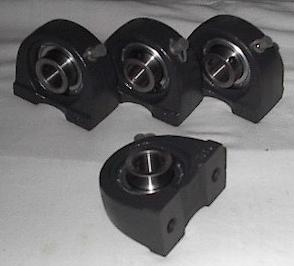
| 12.26.2004: These are four tap base mounted bearings for 3/4 inch shafts. These are going to support my drive axles, which are my only axles that actually spin. I picked these up on eBay from KML Bearing. They took real good care of me there, and if you ever need a bearing I highly suggest you check them out. I contacted them with my application, and they found the right bearing for the job and listed it just for me. Saved me some major bucks over retail, too. |
 |
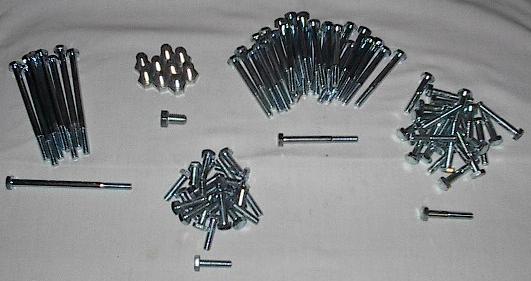
| 1.5.2005: This is a big heap of bolts I picked up at Lowes today. These are mostly 1/4-20, with the exception of those stubby little 3/8-16 in the middle-left. |
 |
| 1.5.2005: Lowes wasn't the only shopping I did today. The good people over at Carlson Steelworks are getting to know me rather well, so I paid them a visit and bought 100 pounds of steel. It may not look like a chassis to you, but I can see it all. |
 |
| 1.5.2005: This is all the little stuff that didn't fit in the previous picture. Small axles, sheet backing for my electronics mounts, and some blocks I should be able to machine into the mounting for my compressed nitrogen springs. That little job will be a piece of cake if they get a new mill at school like they were planning. If not, well... I can do it with a drill press if I have to, but I don't have to like it. |
 |
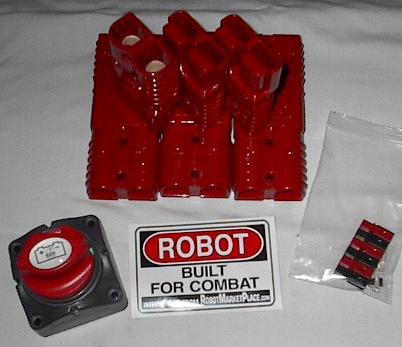
| 1.7.2005: Now the good stuff is starting to get here. This is my first installment of goodies from The Robot Marketplace. This is a place run by a BattleBots vet, and they really take care of you. What I've got here are big, 175A connectors, a master power switch, and some connectors for my computer system. See those little tiny things in the plastic bag on the lower right? Those are for sane sized wire (18 AWG). The red hardware in the middle, on the other hand, are big enough to club a baby seal with. |
 |
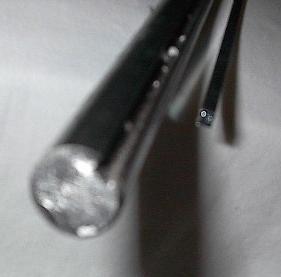
| 1.8.2005: Part number two of my Robot Marketplace order is the drive axle and key. The picture didn't come out very good at all, but there's a keyway machined into the shaft, which is why I was willing to pay over $1 per inch for it. The key is snug (as in, really snug), but I've never played with a pre-machined shaft before, so I don't know how the tolerances are supposed to work. We'll see how it works out when I cut everything to length and get my sprockets. |
 |
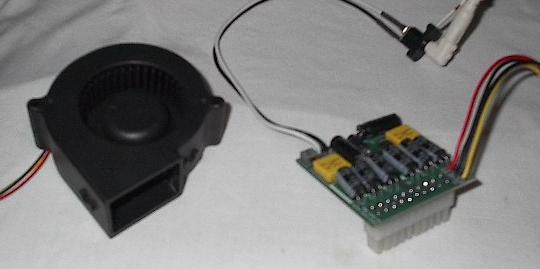
| 1.8.2005: What you're looking at here is the blower and power supply for the computer system. The power supply came with the VIA Board a while ago, but the blower just arrived today. This little thing is going to move over 3 cubic feet per minute of air through my heat exchanger, and should keep everything nice and cool. |
 |
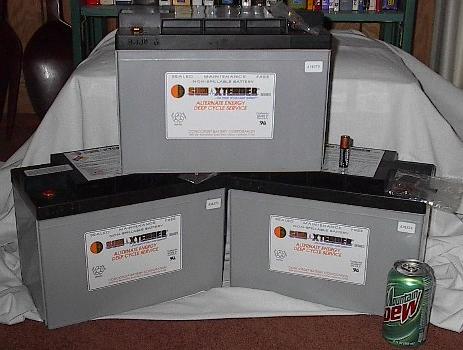
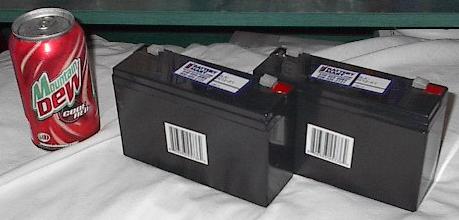
| 1.10.2005: These beasts are the batteries that will provide the juice to keep the robot running for 30 minutes between charges. You are looking at three Concorde Sun Xtender 100AH, 66 pound AGM batteries. Note the can of Mountain Dew for scale: these are serious batteries. I picked these up from Arizona Wind and Sun for a great price. Shipping was steep, but what do you expect for 200 pounds of lead acid? |
 |
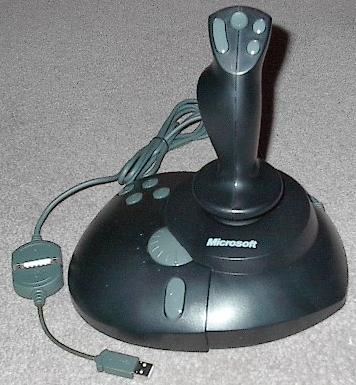
| 1.11.2005: Today the joystick arrived. This is a fairly generic joystick, but it will serve our purposes quite nicely. Most importantly, it has drivers in Fedora Core 2, which will save us a lot of work down the road. |
 |
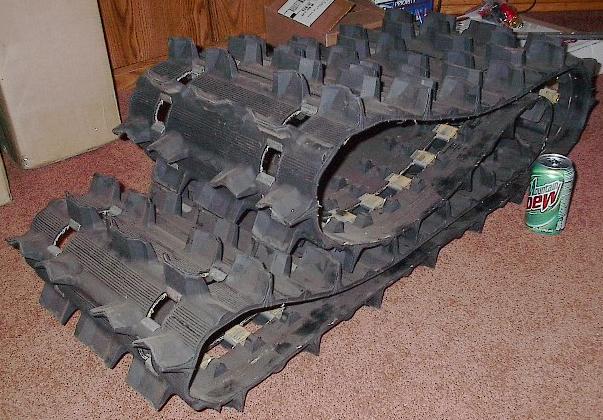
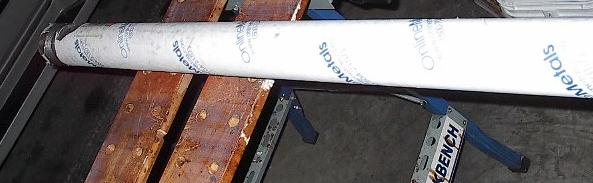
| 1.12.2005: This snowmobile track was an absolute steal. I was hoping and praying to find a used, beat to hell snowmobile track for under $100 when one of my classmates tells me he has a friend. That's always a great way to start a transaction: "Hey, psst. Over here. I know this guy..." Anyway, this friend just bought a deep-paddle track for his sled, and was looking to unload his other one (which was, by the way, brand freaking new!). |
 |
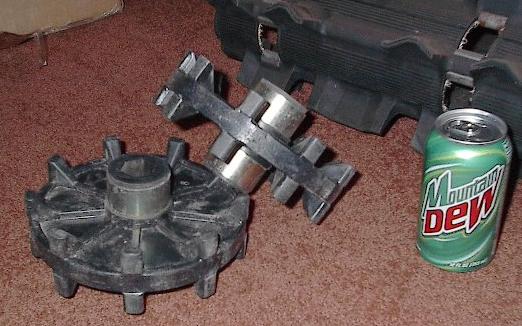
| 1.12.2005: These are two snowmobile drive sprockets which will make good wheels for me. These came from the same guy who hooked me up with the snowmobile track; I got the track and sprockets for $70, which is around what I expected to pay for a single sprocket alone. Thanks Steve! |
 |
| 1.13.2005: Today a package arrived in the mail from NPC Robotics. The only thing I ordered from them were the drive motors, which are going to weigh around 20 pounds each. This box weighs more like 5 pounds, and is about three inches deep. When I opened it, I found this pretty little speed controller. |
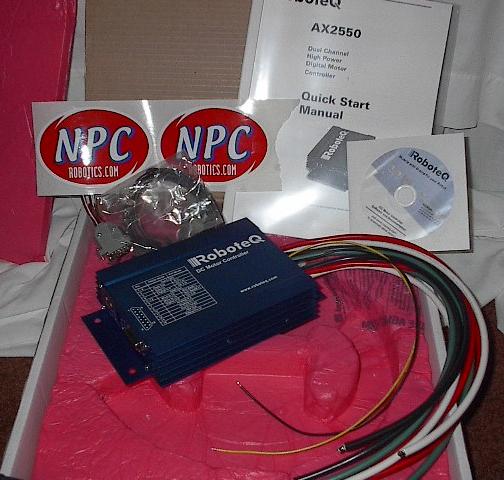 |
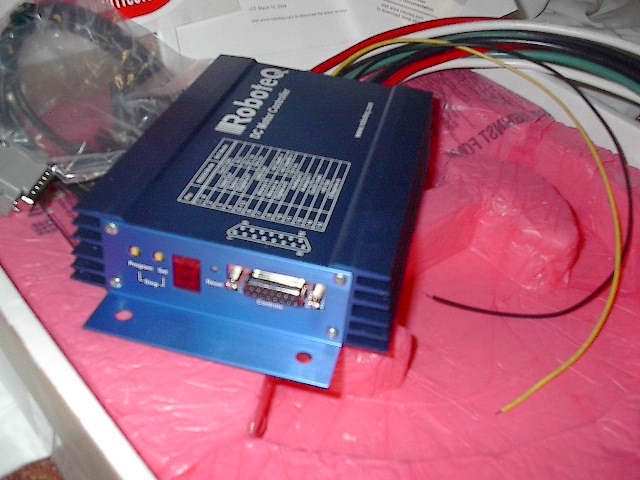
| 1.13.2005: Apparently, this part of my Robot Marketplace order was forwarded on, and the speed controller shipped from NPC instead. Far be it for me to quibble over a return address when something this sexy shows up on my doorstep. Just look at this thing! I can't wait to start testing it out. Update (3.31.2005): The AX2550 electronic speed controller pictured here is manufactured by RoboteQ. I do not endorse RoboteQ or any of their products. Most of the manufacturers and vendors that I have dealt with over the course of this project has really backed up their products and gone above and beyond the call of duty for me. Sadly, I cannot say that RoboteQ turned out to be one of them. The limitations of this product as well as their support became readily apparent during my first major test of the robot. |
 |
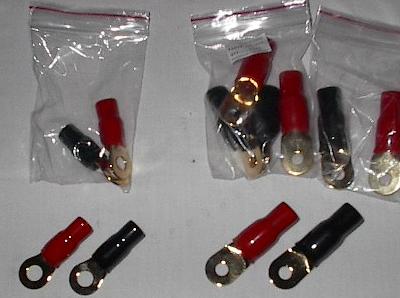
| 1.13.2005: Another testament to my Herculean electrical system are these big, honkin (technical term) ring terminals. I had to go to a car audio place to get these badboys because normal ring terminals just don't get big enough. |
 |
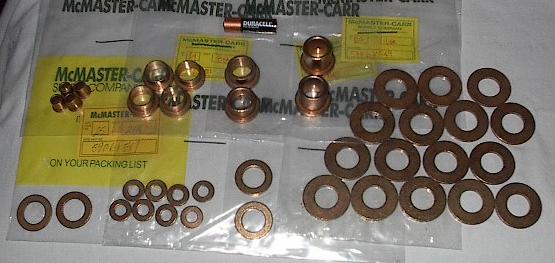
1.14.2005: Today I finally tracked down my McMaster and Carr order! They screwed up and shipped everything (read: over 100 pounds of stuff) to my school's address. I'm not too happy about this, but they still have time to do right by me. In any case, what you're looking at here is a big heaping pile of bushings, SAE 841 bronze ones. Almost all of these will be used in the tensioner assembly.
--Update: McMaster and Carr really came through for me. They've refunded my shipping charges for the entire order to make up for the problem. These guys are awesome. Everyone go there and buy something. I'm serious -- it shouldn't be too hard, seeing as they have everything in stock. I'm really impressed; they took responsibility for the mix-up and went the extra mile to make things right. They'll take good care of you there. |
 |
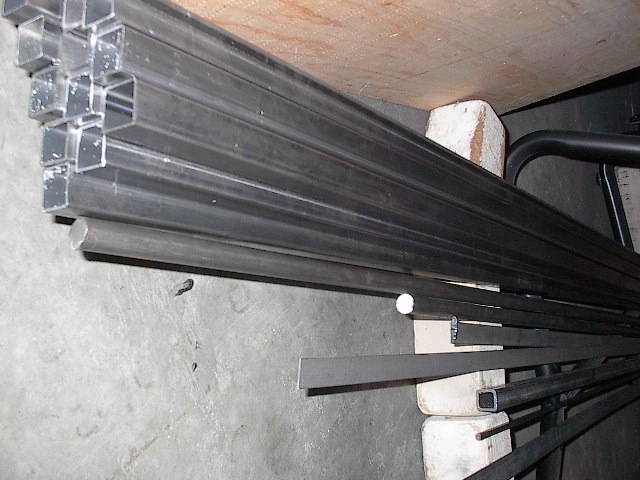
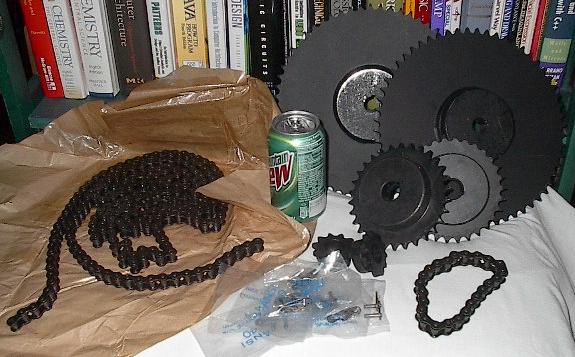
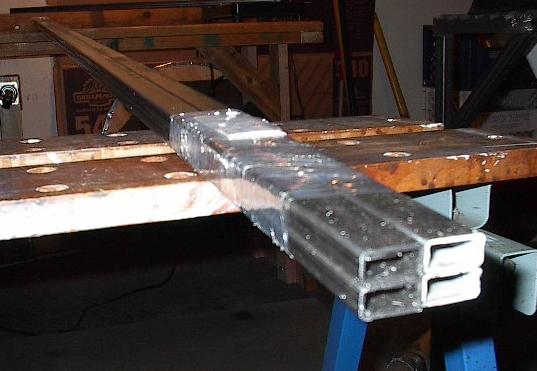
| 1.14.2005: One of the more impressive items in the McMaster and Carr shipment are the parts of my roller-chain drive train. Looking at this stuff, I know my textbook was pulling my leg. I poured over horsepower transmission limits and lubrication requirements, and, if you believe everything my machine component design book has to say, it looks like using #40 chain would have been cutting it pretty close. HA! This stuff could haul a fat yak out of a ditch in Panama any day of the week. |
 |
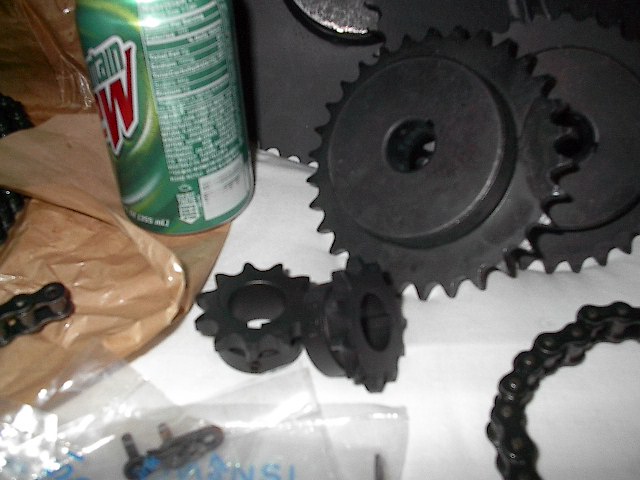
| 1.14.2005: A close in shot of the small sprockets. Seriously; just look at that Mountain Dew can for scale. This stuff is huge. After hefting these things and the snowmobile track, I'm more worried about rotational moment of inertia than power transmission. |
 |
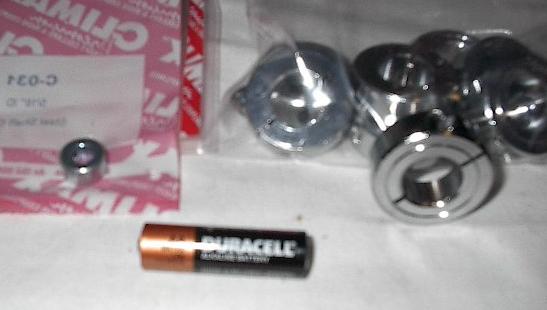
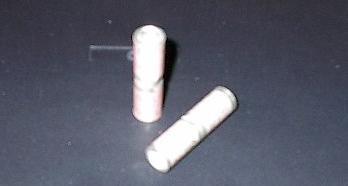
| 1.14.2005: This picture didn't come out very good, but those are supposed to look like shaft collars (the real ones are less fuzzy). These are for 3/4 inch shafts and 5/16 inch shafts (battery for scale). We'll see how the whole 5/16 inch thing works out -- all my bushings and collars are 5/16, but it looks like the wheels have a smaller ID than was previously advertised. Details, details... |
 |
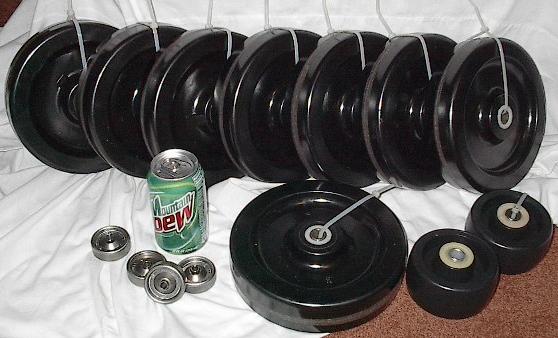
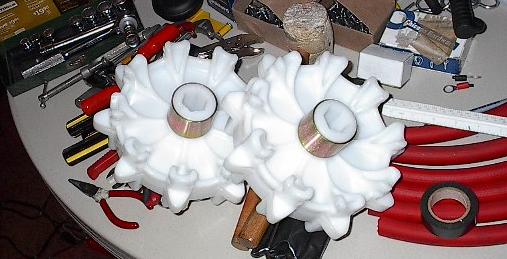
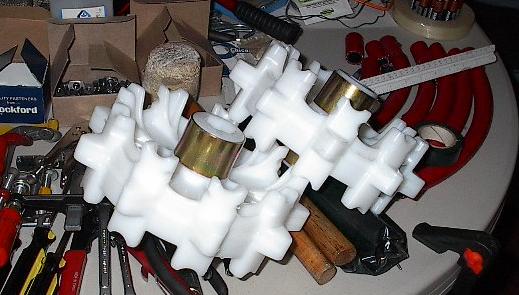
| 1.14.2005: One thing I learned very early on during the design of this robot is that a tank-tread actually requires many, many wheels to make it work. Well, here are our many, many wheels (Mountain Dew for scale). That's eight 8" wheels, two 4" wheels, and four 2" wheels (which have the wrong inside diameter). I'm only planning on using six of the 8" wheels, but there was a drop in price at 8, so the two spares were real cheep. |
 |
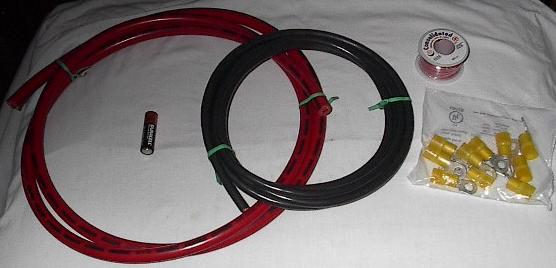
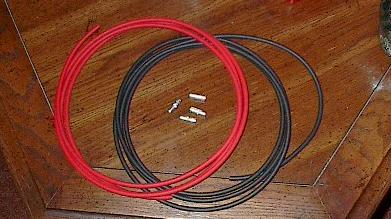
| 1.14.2005: Perhaps you were wondering earlier why I needed such bigass connectors. Well, the answer is fairly simple: they're for my bigass wire. You're looking at a spool (that little thing to the right) of 18 AWG wire (sane), a roll of 4 AWG wire (big), and a roll of 1/0 wire (insane). This is the big stuff. When you whip someone with this extension cord, they stay down. |
 |
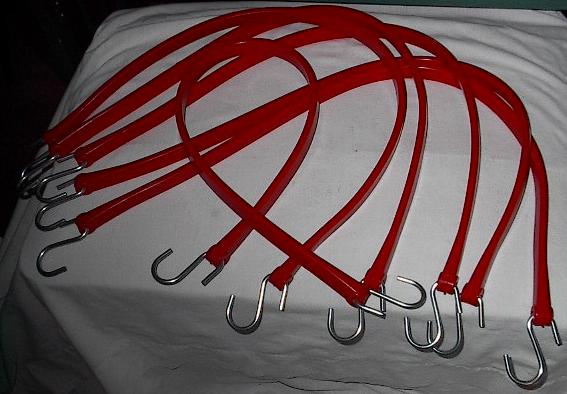
| 1.14.2005: My good ol rubber-band suspension scheme takes shape. You're looking at six polyurethane tie-down straps which are destined to be cut into short strips and strapped over my axles in great quantity. This ingenious little solution was the only thing I could come up with in space and budget, and was brought to you by the letter epsilon. |
 |
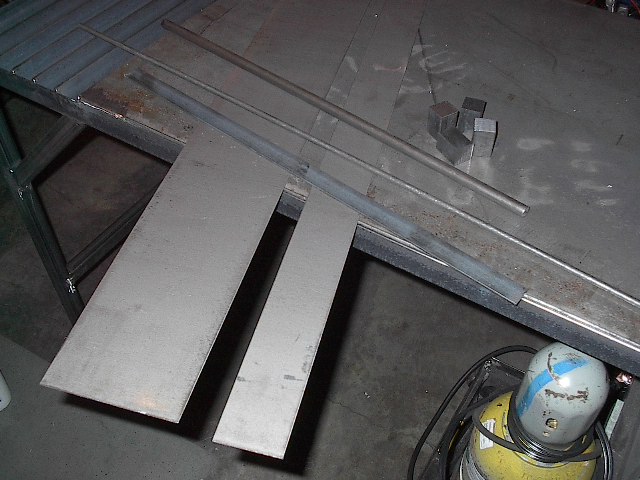
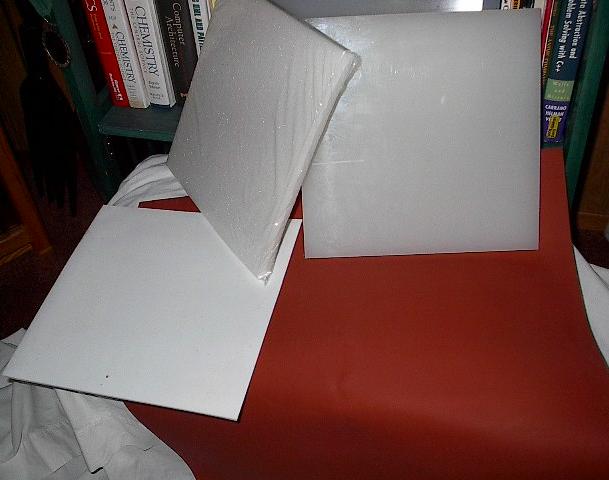
| 1.14.2005: These are the various plastic-type parts I got from McMaster and Carr. Shown here are 1/2 and 3/4 inch plastic sheeting, 3/4 inch foam sheet, 1/16 inch rubber gasket, and 1/8 inch Teflon sheet. |
 |
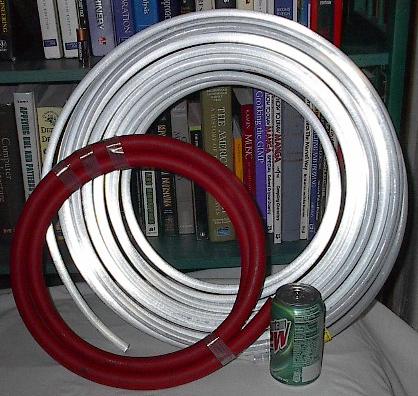
| 1.14.2005: This is the tubing that I will be using to make the heat exchanger. I was worried buying "bendable" aluminum tubing, thinking it would be too flimsy. Well, now I'm a little worried about getting it straight. The stuff is beefy. I may have to get creative in forming the stuff into the shapes I want. Anyway, the silver stuff is the aluminum tubing, and the red is the flexible portion of the exchanger. |
 |
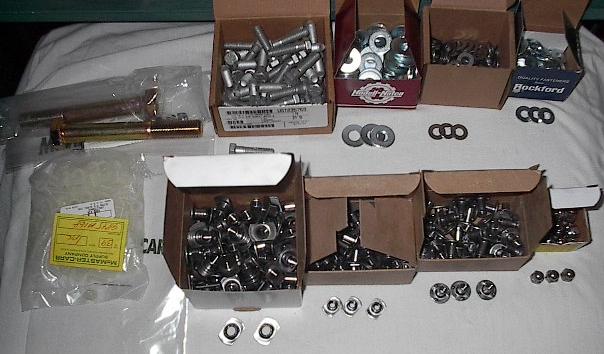
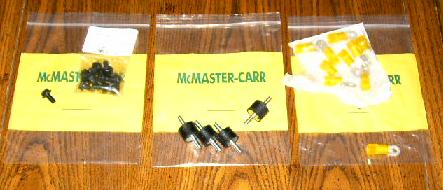
| 1.14.2005: McMaster and Carr is where I got a large amount of the "little stuff." Well, the pinnacle of little stuff is perhaps the nuts and bolts, shown here. You're looking at three kinds of weld nuts, 1/4-20 acorn nuts, shoulder washers, three sizes of washer, 3/8-16 bolts, and 3/4 inch bolts (OK, maybe it isn't all little stuff). |
 |
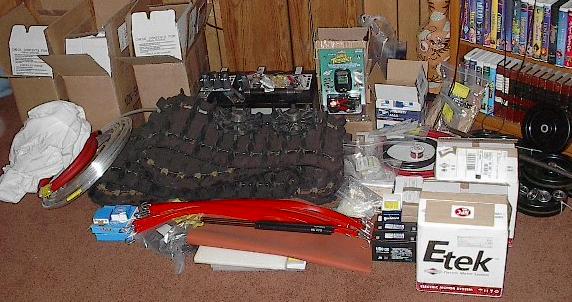
| 1.14.2005: To date, after the McMaster order was finally tracked down, I have one big heap of parts. I think it looks nice. It really gives the room a good feng shui vibe. It says it loud and clear: "an engineer lives here." |
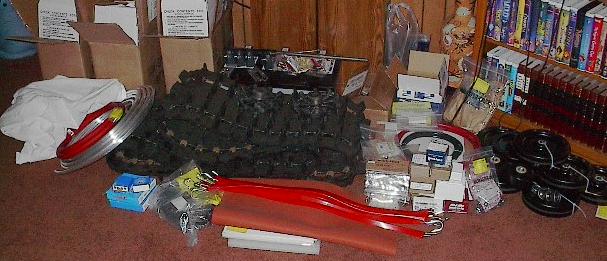 |
| 1.14.2005: Another picture of the pile 'o parts that is quickly overrunning my den. This stuff is like kudzu... Expensive kudzu. Regardless, for those of you that were wondering, this is what a 350 pound robot looks like before anyone puts it together. |
 |
| 1.18.2005: Haven't gotten anything new for a couple of days, but today this big tube showed up on my doorstep. Judging from the writing on the thing, I'd say it came from OnlineMetals. |
 |
| 1.18.2005: The contents of above tube: 32 feet of rectangular steel tubing, 1 x 1/2 x 0.065. No one in town carried anything this small, so I had to buy it online. The shipping, cut fees, and tax cost almost as much as the steel itself did, but I needed to have it. OnlineMetals is a cool place; you can buy all kinds of metals there in small quantities. It's a lot cheaper to buy the stuff locally if you can, but if you can't find something and you've got to go online, they'll take care of you. |
 |
| 1.19.2005: Today, the last part of the McMaster and Carr showed up at school -- the compressed nitrogen extension springs. Since I got these at school, I went ahead and tested them using the facilities in the mechanical engineering lab. |
 |
| 1.19.2005: This is the piston on the tester. These things are supposed to deliver an output extension force of 150 pounds. Well, I couldn't really get a good enough grip on the things to budge them by hand, so I figured this would be an ideal solution. The blue load cell can take up to 5000 pounds, so it should be plenty to measure this spring force. |
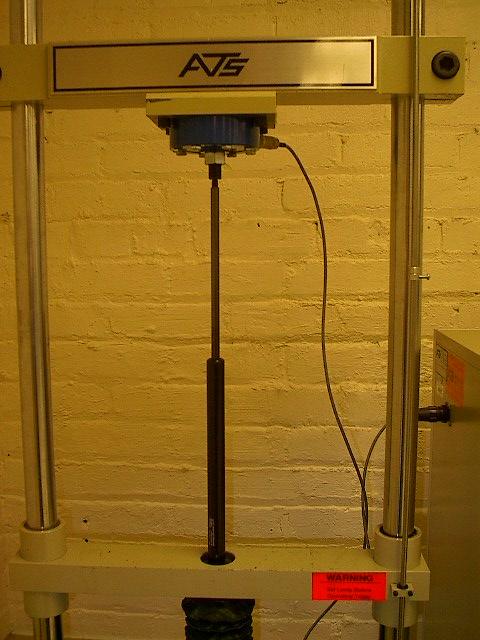 |
| 1.19.2005: 188.7? These were supposed to be delivering 150 pounds. Well, this reading was taken during compression (the tester is moving at the moment the picture was taken), and I would expect this number to be a bit high brand new (they should loosen up a bit with use). |
.JPG) |
| 1.19.2005: Ok, when I stop the tester and let it sit there statically, the load reduces to 156.2 pounds. This does raise an interesting point though. My analysis of tensioner force was all static, but we see here that these springs have a significant damping ability (resistance to displacement at speed). This could have a large impact on the behavior of this system. The second spring (not pictured) produced a static extension force of 154 pounds. |
.JPG) |
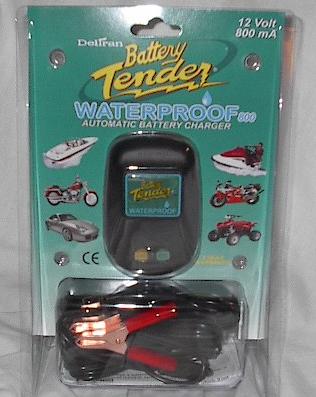
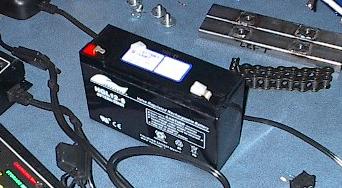
| 1.19.2005: When I got home from today's tests and work at Henry Cogswell, I found three new packages on my doorstep. One contained all my goodies from BatteryMart, including this cute little charger. This will be used to charge up the two six volt batteries that will power the computer and speed controller logic. |
 |
| 1.19.2005: Speaking of six volt batteries, here they are as well (Mountain Dew for scale). These are much smaller than the beasts I got earlier (which is good, because I don't have room for anything bigger). I'm using two six volts in series to get twelve volts because I can tuck these into a really narrow channel of free space under the motors. At this point, there isn't much in the way of free space left in the design. |
 |
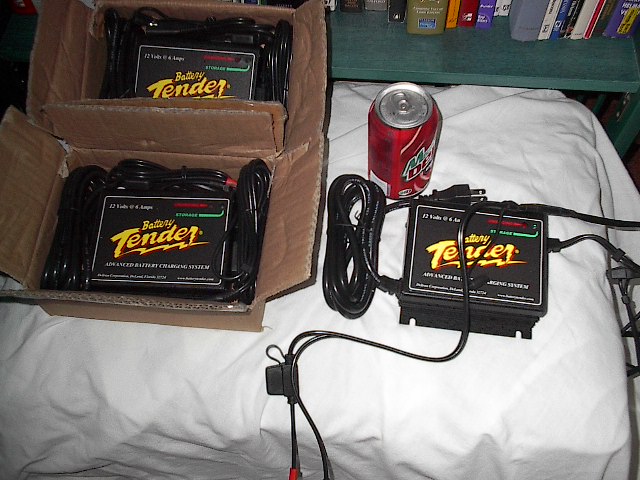
| 1.19.2005: Also in the box from BatteryMart, I found these little goodies. These are three twelve volt, six amp smart chargers for the main power batteries. If my calculations are correct, these should take about as long to charge up the 100 amp hour Sun Xtender batteries as the little 800 mA charger takes to charge up the six volt batteries. |
 |
| 1.19.2005: Unfortunately, due to the other two boxes waiting for me, it was difficult to muster up enthusiasm for small batteries and chargers. The two other boxes came from NPC Robotics, and were labeled in big letters that read "Etek". That's right, my motors were here. Check these monsters out! |
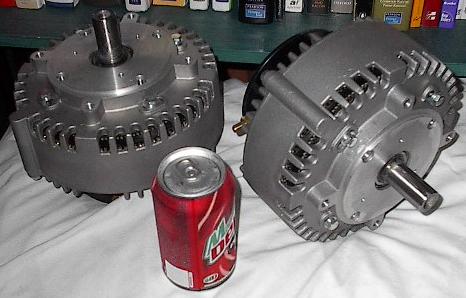 |
| 1.19.2005: Yes sir, you're looking at pictures of two motors each powerful enough to drive a golf cart. Quoted from NPC: "Simply stated, this monster of a motor is dangerous, and not to be underestimated. It can produce up to 15 hp at 48 volts. Without proper handling, it can spin out of control and do damage, to you and anything around you. Read all the information before you decide the Etek is for you." Well, I read a lot of information, and these are indeed for me. I can't wait to mount these up and test them. |
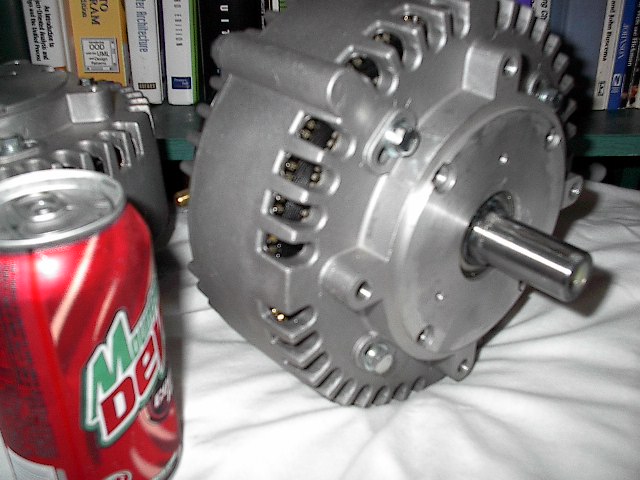 |
| 1.19.2005: Well, they weren't kidding about the dangerous part. I haven't even plugged them into anything and already the Briggs and Stratton Etek electric motor claims the first blood of this project. On a side note, it is remarkably difficult to take a picture with your left hand. |
 |
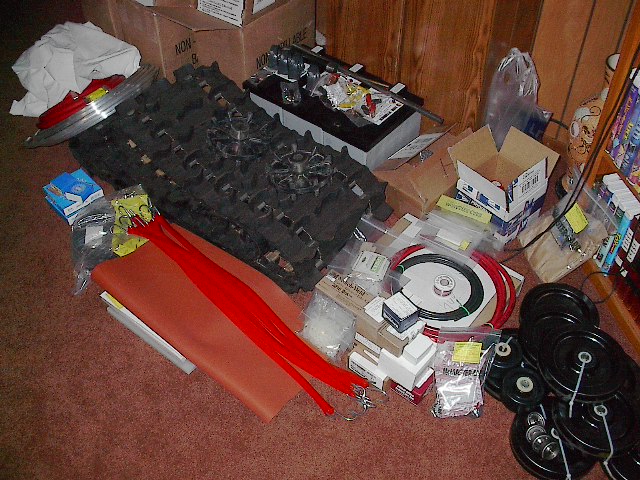
| 1.19.2005: The new, slightly larger pile o parts. This will probably be the last significant addition to the pictured heap -- everything I've ordered to date is here. I've still got to buy some little things (saw blades, replacement brushes, bolts, etc.), but this is it for the big stuff. |
 |
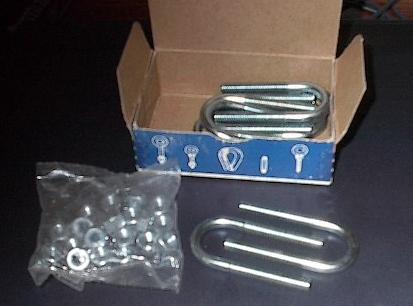
| 1.27.2005: After a couple weeks of construction, I, of course, came up with a list of things that I needed and still didn't have. Well, because McMaster and Carr took such good care of me on my last order, I put together another $100 list of goodies for them and sent it in. Included in this purchase was this little box of U-Bolts, which I'm going to use to hold the front axle in place so I don't have to weld it. Welding a 3/4 inch axle to 1/16 inch steel tubing seemed a little sketchy for something that's going to be bearing quite a bit of load. |
 |
| 1.27.2005: Well, the picture didn't come out very well, but these are two, 1/0 crimps. I'll use these to connect the speed controller to my bigass battery cables. Hopefully this kind of beefy hardware will give me a much stronger connection and better current capability than solder. I also ordered 4 4 gauge crimps for the output from the speed controller, but they haven't gotten here yet. |
 |
| 2.23.2005: It's been almost a month since I posted here, but I got something in the mail, so here we go. One of my three batteries leaked, which I thought was going to cause an absolute nightmare of delays, bills, and nasty email writing. I am very happy to report that those things did not occur. I let Northern Arizona Wind and Sun know about my problem, and less than a week later my new battery was en route from their warehouse. They really took care of me on this one -- no shipping, no restocking fees, nothing. I very highly recommend them: they've really done right by me. Anyway, here you see all three batteries, which is really a sight for sore eyes. |
 |
| 2.23.2005: Here's the box the battery came it. I said in huge letters on top "HANDLE WITH CARE!! PLEASE!" and, as you can see, they really packed the hell out of it. This thing got to my door in great shape. Thanks again, Wind and Sun. |
 |
| 4.1.2005: My replacement six volt battery came today. It turned out that one of mine was a dud, but the guys at BatteryMart helped me figure out what was wrong and sent me a brand new battery. It was really nice, especially after all the headache I've had trying to get information out of some other companies lately. |
 |
| 4.1.2005: Also in the mail today, I got my replacement snowmobile sprockets. I bought these from the guy who runs Tracks USA. They were remarkably hard to find (especially locally), but this guy took my order over the phone at like nine in the evening, and got them shipped out double time. |
 |
| 4.1.2005: These should do a much better job than my old drive sprockets. These are called anti-ratchet double sprockets, because the gear-like teeth grab the metal clips on the track, preventing any ratcheting, and the side teeth grab two sets of lugs. If you check out the video in my testing section, you can see that my track used to ratchet quite a bit (it's the clicking you hear when I accelerate). Hopefully, this will eliminate the problem. |
 |
| 4.2.2005: Today I went out and bought some new wire to run from my new speed controller (hopefully it will get here real soon). A representative from RoboteQ called me last night, and we talked for over half an hour about my speed controller problems. He suggested getting thinner and longer wire to run to the motors. I originally used the thickest, shortest wire I could manage to minimize the electrical losses, but that also created some undesirable properties with regenerative breaking (low inductance and resistance with high armature inertia, I think) that were hard on the controller. In order to protect the new one, a little added resistance and inductance is actually a good thing. |
 |
| 4.7.2005: Today, my new AX2550 electronic speed controller got here. This whole ordeal has been a nightmare. Both RoboteQ and NPC Robotics made this difficult. RoboteQ took forever to get back to me and then were very unhelpful. Finally, over a week after my pleas for help, one of their employees called me and gave me some good info, but they were never able to identify anything I'd done to cause the damage. NPC's site listed the thing in stock, so I ordered the replacement there, with second air shipping. It didn't show up. I called them the morning after it was supposed to get here, and they told me it was out of stock. They did own up to the mistake, and overnighted me one pronto, but it still caused a major problem. Oh well, regardless of the trouble I had getting it, it's finally here, and I still have 28 hours before I have to present. Also in the box were stickers for both RoboteQ and NPC -- I don't think I'll be using those.
Update (5.16.2005): I just want to go on record as saying that NPC Robotics has made me eat my words. They made a mistake with the stock issue, and that caused problems, but they have really gone to bat for me since. So much so, in fact, that I will indeed be using one of the stickers pictured here. If you keep up with my testing progress then you already know that I blew up this controller on the day of my final presentation (after we presented, thank God). Following this, we started complaining again. This time we worked largely through NPC, and thanks to the efforts of Rich Reid, I have now been issued a refund on both units. I'm still out shipping costs, wiring costs, a lot of time, and some high blood pressure, but I'm pretty happy with the outcome, all things considered. Anyway, back to your regularly scheduled parts gallery. |
 |
| 5.14.2005: I went to school today to conduct a robotics discussion and while I was there, I picked up my latest McMaster and Carr order. For some reason, despite the fact that they assured me that measures had been taken to prevent such a thing, they once again screwed up shipping addresses and it went to Cogswell's front desk instead of my front porch. Oh well, this was a little box, so it wasn't that big a deal. Pictured here are 110 nylon zip-ties. Ten of them are big and beefy, and will hold the ESC mounting plate in place. The other 100 are just going to be used for cable bundles and to keep the Teflon glides in place. |
 |
| 5.14.2005: The rest of the package from McMaster contained these odds and ends. Pictured here (from left to right) are a pack of M8-1.25x16mm bolts (for the static tensioning system), four vibration control mounts (for the computer enclosure), and a pack of 1/4" post, 4AWG ring terminals for the new speed controllers. I still need little machine screws to mount the controllers and master power switch, but I'll just pick them up at the local hardware store. |
 |
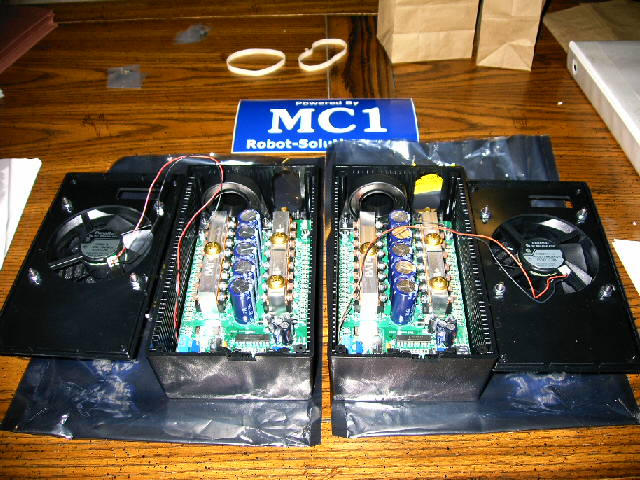
| 5.16.2005: A box from Robot-Solutions showed up today, and inside I found these two little beauties. That's two MC1-HV single-channel 400 amp capacity speed controllers. I'm really looking forward to playing with these and finding out what they're capable of. David Moeller, the guy who runs Robot-Solutions, contacted me and gave me a personal guarantee that they would work for my application, so I have very high hopes. |
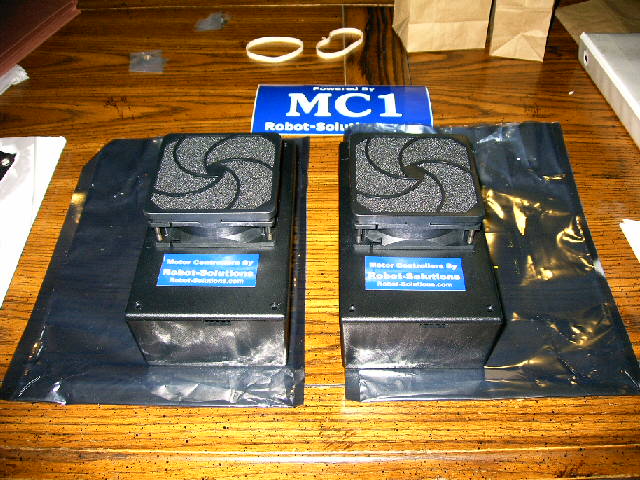 |
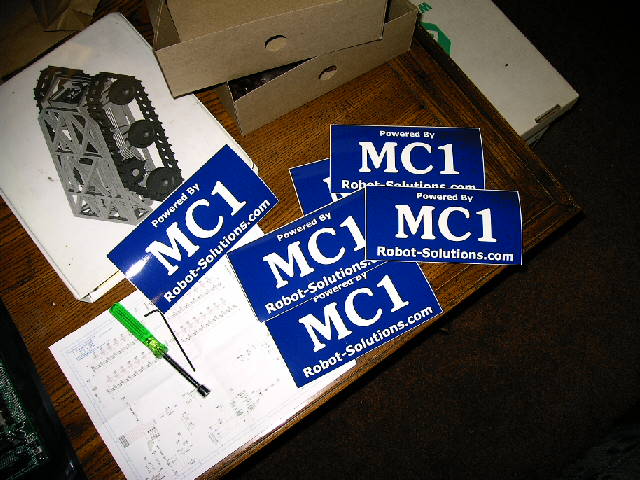
| 5.16.2005: Also in the box were a remarkable number of Robot-Solutions stickers. If these things work, I'll gladly slap one of these things on the robot. So far, I've been very impressed with the company. I've had a lot of questions for them (especially since I'm working out the interface details without their board), and they've been very patient and helpful. They've really been a pleasure to deal with, unlike some people I could mention. |
 |
| 5.16.2005: Here's what they look like inside. Looks nice and robust. Looking at the pictures I could find of these online, I thought the big silver parts were finned heat-sinks, like you'd find on a processor. Actually, they're just big solid blocks of aluminum. It makes for nice solid connections, and I suppose they'll do the job quite admirably considering the intermittent loads these controllers tend to be subjected to, but they won't have much luck in steady-state terms. I'm not worried though -- we'll be current limiting them down quite a bit from their rated capacity, and everyone I've talked to has been really impressed with these things' performance. |
 |
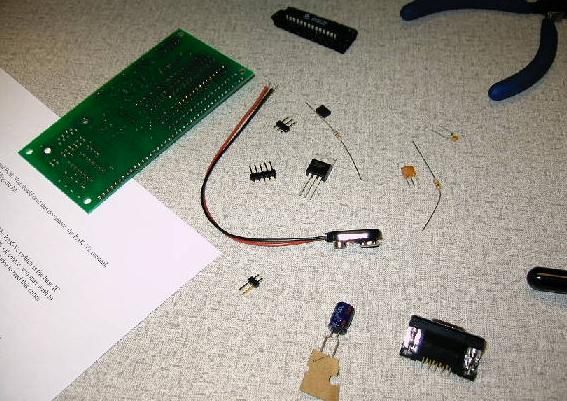
| 5.18.2005: I am really grateful that I took the embedded systems course my last term, because today the PWM driver got here and it looked like this. We put together our own Handy Boards in that class, so we learned all kinds of soldering techniques and basics of electronics construction. Without that experience, I wouldn't have had any idea what to do with something like this. There wasn't any indication when I bought this that it would come unassembled, but I figure I can get it put together and tested in a couple hours. By the way, the workhorse of this component can be seen set into a little piece of black foam at the top edge of the picture. That's the PAK-V PWM Coprocessor. |
 |
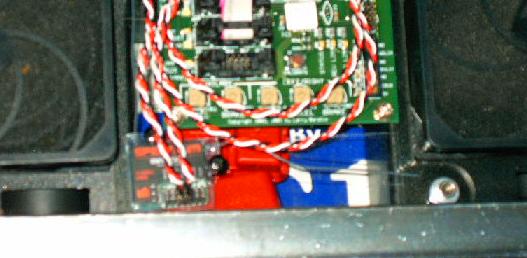
| 6.10.2005: This is my new uMOB2, made by Robot-Solutions. It will replace the PWM coprocessor pictured above. I'm still not exactly sure what happened, but at some point during my testing of said coprocessor, the MC1-HV speed controllers were damaged, and three integrated circuits were destroyed. Now, this isn't really that big of a deal (David Moeller did all the repairs for only $21), but I didn't really want to deal with it again, and David has more-than earned the sale, so I picked up this neat little device specifically designed to do what I want. |
 |
| 7.03.2006: It's been a long time since I've added any parts worth mentioning, but I finally sprung for a reliable control system. The software in the original design all worked very well, but the laptop I was running it on was hit-or-miss. My solution to this is to replace the whole mess with this radio. This is the Spektrum DX6, a 2.4 GHz radio system. This is a really reliable system and I can crank it up at a moment's notice, so I don't need to deal with any boot-up or wireless network headaches. |
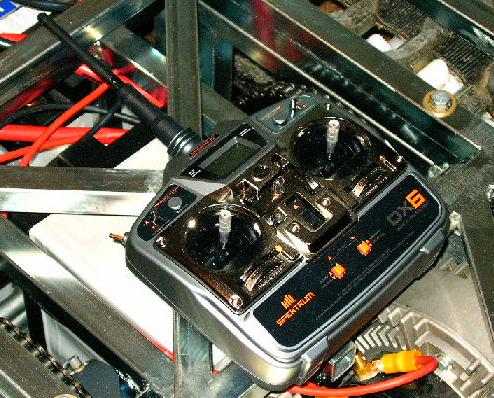 |
| 7.03.2006: This is the receiver for the radio system. It is absolutely tiny! Also notice how it has two antennas. It actually receives on two different channels at the same time so if one glitches out I'll still have control. By keeping the antennas at right angles to each other, I should be almost immune to any kind of interference. |
 |